Only your concern that they need flattened. I was worried about it before
Yes. Always. Any time a head is removed, check for flatness, and if it’s OHC, check the cam journals for being in line. This might be obvious, but maybe not: the head WAS flat when it left the factory, and the cam journals were aligned. IF the head is no longer flat on the bottom, it’s logical that it’s no longer flat everywhere else, too, including the cam journals. “Milling” a head is intended to be a cleanliness service, not a flattening service, though it is often abused to be such. Nothing wrong with it, per se, but if your cam journals are out of whack, it will lead to premature wear, possibly breakage, seizing, etc.
Only that the cam journals should be addressed FIRST, as they are harder to fix. Then, if needed, “milling” the head to flatten/cleanup the mating surface is acceptable.
Absolutely. This is necessitated by whatever caused the need for the teardown, not the mileage.
Yes, when they were new, and in spec. Now that they (may) have overheated to the point of warping the head, the cam journals may also be out of spec.
Maybe. But if it overheated to the point that the head has warped more than before, it may now be worse. Also, as of 20 years ago when I was in this field, the quotes tossed around were 75% of cylinder head warping was caused during removal, so there’s that.
The fact that is seemed to run OK for those hundreds of miles means I’m likely over-sensitive to this concern. I hope that I am. But I wouldn’t feel good about not having mentioned it.
I am less prone to blowing off advice from the DMS experts now that I have learned the hard way.
Let me articulate the concern about these heads so it is clear why I am resurfacing. I have not seen evidence of head warpage. That is not the reason I am resurfacing. The concern is that the heads are not putting appropriate pressure on the locations where they need to in order to create an appropriate seal to keep pressurized gasses in cylinders contained during combustion. From watching the video with the preacher, he points out that you need to keep sanding down the head until the rings disappear, testing with feeler on flat surface regularly. So evidently, heads develop indentations in certain spots, especially around the cylinders. I guess that would be warpage, since where does the material go? So then let me clarify: I have seen no evidence of macro warpage across the head. Instead, what I have seen is areas that have indentations where they need to be flat to keep appropriate pressure on the head gasket, so as to prevent leaks.
You have mentioned it. I have heard it. Now let me get to the reason I am resurfacing as opposed to using shop. I went to the shop today. They told me monday, since I suggested that I might want to capture the process on video, and that is when owner is in. I am impatient. So after seeing the preacher video, and I located large sheets of sandpaper, and I liked the way preacher’s heads looked once resurfaced, I opted to give it a shot. I would like to have the Mazda running by monday, if possible.
So it is macro warpage of heads that creates impetus to be concerned about journal alignment, right?
The hydraulic adjusters compensate for rocker arm wear, valve stem length lost, valve and seat recession. Basically they prevent wear from allowing the valve train to become loose, or worse yet tight so that the valves can’t fully close. Nothing they do accounts for, or relates to the location of the head face. They also aren’t adjustable, rather as long as they are clean enough internally to work correctly, they automatically adjust to the valve train.
Edit to add, they self adjust rather quickly. In fact, a clatter on start up that you often get on start up of older engines is valve train noise from them having collapsed on any one holding a valve open, and the oil passages having drained while sitting, so no pressure is available to fill them until all the air is driven out of the oil passages.
When I installed the new short block about 1-2 months ago, I pulled all of these out, cleaned them inside and out, filled them with fresh engine oil, and replaced. After cleaning them, I was able to press the center piece in a bit with my finger on each one. There is a spring inside each one, and they sort of had a squishy feeling when I pressed.
Well I looked at a couple since I had the heads out today, and I was not able to squish them at all. Should I be concerned about this, or not really?
And I think I found a good portion of the reason that I had the head gasket leak problem. The engine calls for dual sheet steel head gasket construction. I had thought the head gaskets I installed were of the dual steel variety. They seemed to be caked within some tarry like material, which I assumed was sealant material of some sort. I purchased these on ebay, as they came with a kit I had bought for engine rebuild. Well now that I had the leak issue, and had to buy new head bolts and new gaskets, I was able to destructively look at what is under the tarry substance. Ang guess what? The gasket is not double steel! What the heck?
The good news is that I can clearly see that my new head gaskets, the ones I will be installing tomorrow, are for sure of dual steel variety.
Which brings me to the last question that I have to make a decision about before install. You see, the short block is new. It has 300-400 miles on it since I ran it for a bit with the other, non-steel , head gaskets. Well, the tarry substance stuck to the heads and the new Mazda (Ford) short block. When I sanded the heads, of course this coating came off of them. But the coating of this tarry substance is still present on the new short block. What to do? On the one hand, it is a fairly even coating. On the other hand, I want this install to seat properly and last for a good long while. Any words of wisdom about that coating of tarry like substance? Should I keep it, hope for better adhesion to steel due to its presence? Or remove it. And if the directive is to remove it, then how? I don’t want to create any unevenness on the short block head gasket mating surface, and I imagine that it is still perfectly flat since I just pulled it out of that Fort Motor Company box a few weeks back (Mazda is printed on short block even though Ford distribuited it).
You need clean metal for the new gasket to bite. You can probably start with solvent and scraper, but will almost certainly need to finish with scotchbrite or sandpaper. You could probably put a large sheet of sandpaper on a sheet of mic6 aluminum, and finish much like you did the heads. But real world, nearly everyone just uses Rolock scotchbrite disks on an angle die grinder.
This is not referred to as “warpage”. Warping refers to an out-of-flat across the length, width, or some other dimension of the surface, generally stated as “x out-of-flat over x distance”. This is, rule of thumb, .004" inches over the length of the head.
You are referring to “pitting”, to use the common phrase. It is caused by any number of things, but the most common are “erosion” and “corrosion”. To address the question of ‘where does the material go’: it depends, but usually into the coolant system, it being the most susceptible to both erosion and corrosion.
Yes. That and having worked this business for some time. It’s just one of those things that you ALWAYS check as a professional. You don’t want to waste your customer’s time and spend their money only to discover some OTHER problem. Customers tend to perceive this as “your fault”, even if you warned them repeatedly.
But since you are your own customer, you can determine for yourself if I’m just being a worrier, or if you really need to be concerned. The fact that it worked before bodes well, but is not what I would call “surefire”.
No.
Kevin addressed this well:
No. This is good. Hydraulic lash adjusters work by using a spring to provide initial tension, keeping the follower in contact with the camshaft. This spring is relatively easily compressed, as you saw when you manipulated them on the bench. Once oil pressure is attained in the engine, the oil fills the chamber created by the spring. The oil, which is non-compressable, makes the lifter effectively “solid”. This is referred to as “pumped up”. If you remove the oil (either through sitting long enough to leak out, or by removing the barriers to escape by opening the check valve or forcible disassembly) and then put them back together, they “get squishy” because then only the spring action holds them open. You can simulate the pump up by submerging them in oil and manipulating them to replace the air in the chamber with oil. Once you attain this, they will be “solid”. To test them properly, you use a hydraulic lifter tester jig.
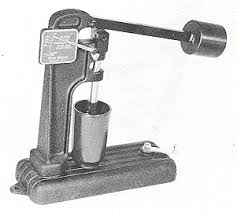
You put the lifter in the cup, fill the cup with test oil, pump the lifter up, then rest the weight arm on the lifter. Every “so often” you turn the cup with the crank handle to simulate a turning lifter in operation, and use the manufacturer’s specifications for how much leakage is allowed over time. The scale on the left in the photo is used for reference. These days, most folks “wing it”, especially if they’re working with hardhats.
I second Kevin’s advise:
And here’s what I said about that back in post 53:
Which is echoed by Kevin:
It seems to me like you’re on the right track. Remember, clean, clean, clean, especially after using abrasives. It sounds like you’ve got a better part for the head gaskets. Follow the torquing procedure precisely, and hold your tongue just right. Maybe slaughter a chicken (or at least dedicate a bucket of KFC) to the beast and you’ll be good to go!
I have the surfaces as prescribed on the heads. I have high confidence we will be all good on that side.
So the question, as I am not sure I have made all the relevant detailst properly clear,about the short block side. The answer may be the same, but I want to get the point across, because I am thinking that I may be better off to take advantage of a fact apparent to me that may not be so clear to all of you guys. I have been up all night, so I need to get some shut eye before I do anything, but here are some facts I want to make sure you understand and factor in:
*The short block is brand new, from Mazda in Japan (through Ford in USA to me), I have put about 350 miles on this shrot block. So I imagine that the surfaces on the piston side has yet to develop any sort of imperfection at all yet. It should be flat right now, and anything that I do to it would take away from that flatness.
*What is covering these perfect (I believe) surfaces is a nice, uniform layer of adhesive from the previous brand new head gasket. This adhesive adhered so well to the block metal that it stayed when the gasket was pulled off. The adhesive layer is still sticky and malleable. I think it will stick to the new head gasket quite well. I’ll get you a picture after I get some rest. You need to see the picture, and really touch and feel the consistency of this adhesive.
So I think I get two positives for going forward without changing anything on the short block side: I get the Mazda flat surface. AND I get andhesive for cylinder head gaskets that IMO will improve adhesion of my new gasket to this surface.
This is my request. Please withhold your response until I send the picture. You can still answer that way if that is what your experience says to do, but my request is please wait and see the pictures I send later today.
Thanks for your help, gentlemen. I will make the right call, And about City Motor Supply, I went there Wed AM as I was going to have them check and surface these heads. However, I also wanted to see the checking process take place on one of the heads, and I also advised that I wanted to film what they did to share with your guys. Well, the clerk wiesly advised that he could not authorize that, but that owner would be in Monday if I wanted to ask him…
I have additional details I will be sending in soon. Details like the fact that the head bolts are a millimeter or two too long, so I will measure all of them and send in details.
If the installation instructions for the correct gaskets do not call for adding adhesive or sealant, it will not be wise to presume that what you have is beneficial. From your description, it should be easy to remove the goo by repeatedly sticking some tape to it and quickly pulling it off if you do not wait so long that it cures. If that does not work, small amounts of chemical solvent should do the trick. In any case, stuff some paper towels into the cylinder bores to help keep stuff out and do not succumb to the temptation to scrape that stuff off.
Good video!
I’d forgotten this is an aluminum block.
Seeing the video, hearing your reasoning, and factoring in this is not a cast iron block, changes my opinion about leaving the residue of the former gasket not one iota.
It needs to be clean.
There are EXTREMELY rare instances where I have a different opinion (one being, as Bill says, if the manufacturer recommends a dopant) and this is not one of them. Even if it were, my opinion would still say “NO!” to leaving the residue from a (if I understand properly) failed gasket.
If this were in my shop (not that I have one) I would stuff the holes, Roloc the surface, cleanup so’s you could eat off it, and install the new gaskets.
That sounds worrisome, but might not be. You’d need to verify (which you say you’re doing) and, IF you think the new bolts are a mm or two too long, measure the hole they’ll occupy. Even IF you do NOT think they’re too long, you might want to thread them in till they bottom out and measure the protrusion vs. the height of the head, just to be sure.
Thats 2/2 against adhesive. Guess I gotta get it off.
I think that the gasket being non-steel is the real problem I faced previously. When I dismantled the old engine, it was without question a dual steel gasket that I removed. So it stands to reason that this is what must go in.
OK, so from my research, roloc has a horrible online reputation. And I don’t see any way to give myself a nice surface using that approach. Additionally, I think that I have a nice surface already. So I don’t want to alter that in any way.
So I’m leaning toward Bill’s solution of using chemical solvent to remove this adhesive. Can anyone name some name brands and product names that may be a good choice for solvent? Rubbing alcohol? Brake cleaner? Diesel based products? Suggestions?
Thanks for the input about the bolts. I think that this is dead on, and the direction I was already leaning. You see, its one thing for the manual to suggest that the bolts are too long. But proof is in the pudding. Measurement of bottom out point tells me if I need to use a washer or two, or my preference, none at all.
As for having extensive instructions concerning the installation of these head gaskets, there are none that I have. I have mazda service manual and it goes into detail about how to torque in the bolts. Beyond that, all other factors are up in the air. My belief is monkey see monkey do. Dual steel out, dual steel in. Follow torque sequence.
As for heads, after removing all evidence of rings around where the cylinder bores contact heads, I put the heads on the marble block from woodworking area. I was able to slip 2 mil feeler guage in some places under heads. At no point was I able to slip the 5 mil feeler guage under any portion of the heads. So I guess this means I am within the 5 mil max tolerance suggested in previous post. Any feedback here?
It really depends on what it responds to. Denatured alcohol? WD-40, Kerosene, Acetone? (If acetone, be really good with gloves, you will be doing enough to seriously remove the protective fats in your skin)
It also seems to me that there will be some rubbing involved. Now from what little I know about metals, if I wish to not alter the shape/form of the existing metal, then I must choose something softer than that metal to come in contact with it, right? Paper towels? Cotton cloth? Am I on the right track?