Learned how to weave this week! Not perfect…but i love it ![]()

14 Likes
Very nice!
1 Like
As a newbie to sewing, I’ve been having a big learning curve making PPE masks. I settled on adding fabric tabs and enclosing Goody elastic headbands instead of ponytail holders to hold the masks in place.
The photo shows one clipped and ready to sew.

I had to take a break from the frustration of having a picture in my mind that my skill set doesn’t match (yet) so I crocheted a variety of ear savers for masks to blow off some steam.

It’s great to see what our fellow makers are creating even when we can’t physically be together.
10 Likes
I really like the crocheted ear-saver idea. I’ve 3D printed a bunch and the one complaint I’ve heard is that the plastic ones can kinda grab at your hair. These should be soft and comfortable.
3 Likes
So I bought a 3d printer last month, a Creality 10S Pro, It finally showed up yesterday.
My first print was this Pig. It was a test print (provided with the printer) with all the default settings. I think it turned out pretty damn good for defaults.


14 Likes
Shay, I’ve used my food savor since about 2001. As a single person, I often find it difficult to find meats in one person portions. I get bulk packs and break them down and vacuum pack them. It would also be a easy way to compactly store leftovers. I’ve used it to marinade meats with juices and salad dressings for flavor. It should also be good for freezing fruits and veggies. You can just drop the bag into boiling water to heat.
I’ve moved 3 times since 2001 and the food saver is a good way to save space and pack stuff for long and short term. As I found out though - don’t use it to store leather dyes. The vacuum suck the dye right out of the bottles.
I don’t use it everyday so a roll of the vacuum bag material goes a long way.
3 Likes
That’s three recommendations this week, so I think I’m going to look into getting one. I regularly buy meats from costco that I break down into smaller servings (only 2 of us) and put into ziplocs to freeze, and I also often sous vide food. I think I’ll get a lot of use out of it.
I do the same thing. A full pork loin from Sam’s club can easily be split into 3 for me.
I’m bought my first FoodSaver back in 2003 at killed at sometime around 2011 and bought another one and I’m still using it to this day
1 Like
I printed a SD/microSD card storage container (not my design) for all my software I use at work. I like that it should fit in my cup holder. This print was going on during our Ebay class today. I just cleaned it up where the raft meets the print.


Here is the link to the file I used from Thingiverse.
9 Likes
I made a little progress on my D20 (up a bit in this thread), and by “little” I mean that I mostly learned I don’t understand analog electronics nearly as well as I should. I realize it’s all analog in the end, and digital is just an abstraction (but one I can wrap my head around much more easily. ![]() ). I hope my mistakes help others be smarter than I was, or at least less embarrassed when you make dumb mistakes like I do.
). I hope my mistakes help others be smarter than I was, or at least less embarrassed when you make dumb mistakes like I do.
I decided to try to use some MOSFET’s to switch the PWM of my 3.3v ESP32 to drive my 5v LED strip. There are a lot of articles out there about this, but I liked this simple to follow one (found this a little too late):
What I didn’t really appreciate at the time is MOSFETs come in all sorts of configurations, and it’s important to pick the proper one. Different horses for different courses. I decided to unwisely order a few IRF520PBF’s, because it’s a “power MOSFET” and I was apparently feeling extra macho/idiotic at the time (full disclosure: I don’t remember alcohol being involved). This was a really bad idea, but I didn’t understand/respect the spec sheets like I should have. It turns out this MOSFET isn’t really designed to be switched necessarily with “logic level” voltages. I talked to @michaelb about this on our Discourse, and he explained quite a few things to me about this (thanks @michaelb!) . Driving it with this MOSFET actually made it dimmer than the 3.3v PWM directly, which is the EXACT opposite of what I was shooting for ![]() .
.
Wanting to learn from my mistake, I decided to simulate this thing in LTspice (XVII). I found a PSPICE model of the MOSFET in question (IRF520) and decided to import and simulate the circuit. This video helped with importing the model (although I didn’t take the time to make my MOSFET look proper like he did for the OpAmp he was simulating):
 with sample simulation")
Once I had it in, I put together a circuit to simulate the 3.3v PWM signal (V1 in the schematic), the 5v LED strip (V2 with a small load, not sure if that resistor is the proper size), and the MOSFET properly connected. Simulating this circuit with a 3.3v PWM produced these results:

The green graph is the 3.3v PWM. The blue graph is the voltage at the D (drain) pin of the MOSFET. As you can see, the voltage on both sides of the load is 5v, and therefore no current is actually flowing.
If I crank up that 3.3v PWM just a bit up to 3.8v for instance, we start to see much better results:

We’re actually pretty close at this point to a full 5v potential across the load.
If I keep cranking up the Gate voltage (PWM), I get closer to the desired 5v swing, but obviously almost nothing was happening at the voltage I was actually using on my Gate pin.
I’ll source a new MOSFET soon and certainly try to simulate it ahead of time. Ideally I will take the time to learn how to read the datasheets better by then. I’ll probably end up picking something more like the IRLB8721 mentioned in the Adafruit article, but apparently it’s hard to find right now:


Time to read spec sheets of the alternates I guess…
UPDATE: I simulated the suggested replacement part from Digikey (FDP7030BL) and it looks to fit the job quite nicely. The PSPICE model had a temperature pin that from Googling around looks like you use 25v @ room temperature. I’ll be ordering some of these…

7 Likes
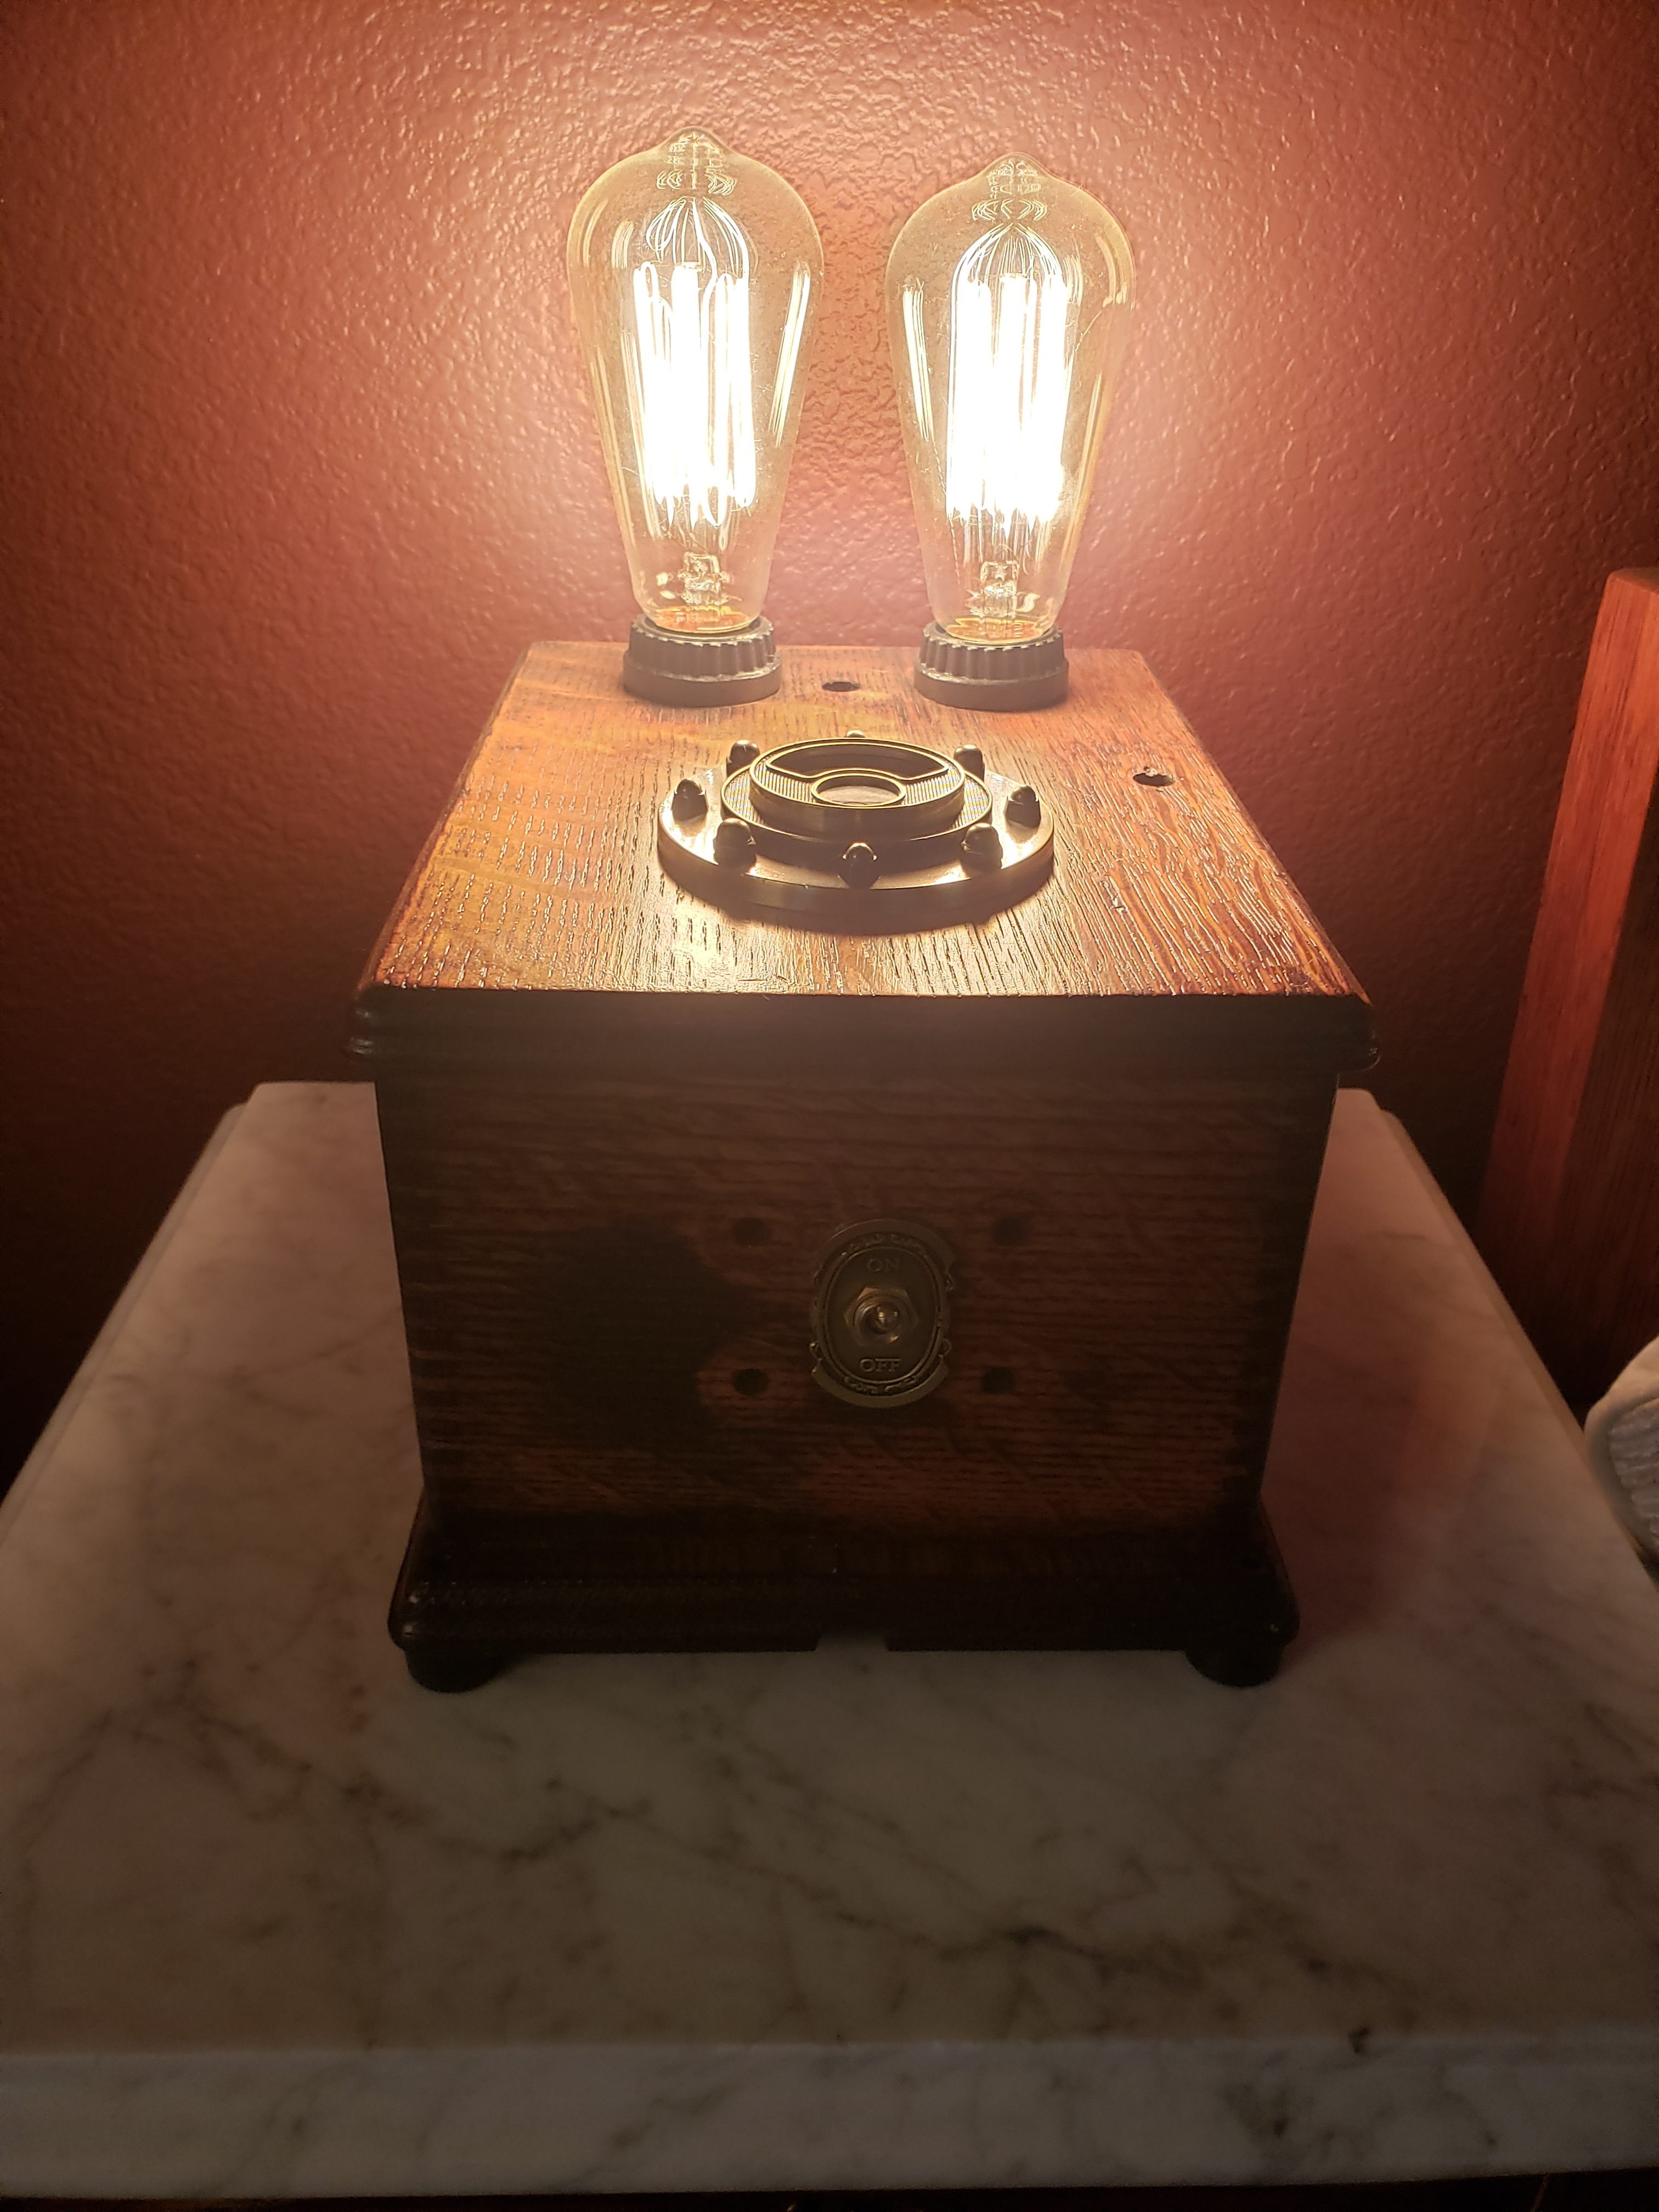
Hello,
I just joined the group. I am a woodworker, antique hunter/restorer and upcycler. I’ve been making lamps out of old phone boxes. All components are made out of UL listed reproduction parts and wire.

23 Likes
How cool is that??? Thumbs up.
Thank you. The cool thing is every one is a unique color and size.
Cutting a big pile of inside and outside layers for the next batch of masks this weekend.

The taller stack of outer layers is just shy of 10" tall.
13 Likes
Here is a money clip wallet I made this weekend. I have been trying to get a stain mix that replicates a Marine Corps Dress Blues coat. It’s midnight blue, its so dark it’s almost black. I think I finally have a good mix. In bright light the blue does come out, overall it works.


11 Likes

I made a pull strap for one of my sewing tables. I have a folding sewing table that has wheels, but the wheels are placed in a location that doesn’t allow easy pulling. The edge of the table often scrapes the pavement. This will clip onto the leg portion opposite the wheels, allowing the whole table to ride low enough for efficient wheel usage.
I was pretty proud of myself for remembering the instructions for hand-stitching that @Webdevel provided when I took his passport case class in late 2018.
14 Likes
With Digital Media closed, I’ve had to create a mini photo studio in my apartment. Really missing the DMS camera and lens collection!

10 Likes
Not quite done, it will have to wait until DMS opens again. My access key broke on me some number of months ago. That day I took up some dimensions & drew up in Fusion a new key socket. At the time when I drew it, I didnt have a full vision on what I exactly wanted. When I got my new 3D printer the other day, I figured I could prototype it in PLA to check dimensions & fit. So I decided to put a hex on the back side to accept either a 1/2 socket or an adjustable wrench. While I was at it, I went ahead & put a hole in the side so I screw driver could be used as well to turn it. Sunday night I attempted to print but without success, I figured I’d get some sleep & try it the following evening. Last night I was able to print it successfully. Not only was it a successful print but dimensionally everything fits up. Yes including the 1/2 hex. I do intend on doing setups in the HAAS then running small batches.
Here is a picture of the broken key, IE cast out of cheap pot metal

Newly thought out key


The wonderful Triangle lock

8 Likes
I wanted a crazy video background for our video conferencing calls at work, and I took some inspiration from iterative math in the complex plane. FRACTALS!
I saw a site that showed how to use an “orbit trap” (the moment the iteration yields a number inside the “trap”, that value is captured) to color an image with a bitmap. The spot where it enters the trap is translated to a spot on the source image. That site was here: Make Fractals of Images
The thing I’ve always loved about Julia type fractals (since my Fractint days where I wrote programs to generate .bat files to duplicate this) is you can move the “c” in the equation around and get some cool animations. In fact that site was the first hit for “animated julia set”.
So I decided to write some Go code to replicate the orbit trap image mapping (although I made mine a circle instead of a rectangle) with this moving “c” value. I picked a 5th order Julia set (which gave me a star looking pattern) and decided to move “c” around the unit circle (centered at (0, 0i) ).
This produced a nice continuous perfect loop of animation (ends up where it started and there are no super jarring changes). At that point, the only issue I had was cropping the rectangle a bit to get a better size, and then eventually adding bilinear interpolation (Bilinear interpolation - Wikipedia) to take out some of the banding due to the same pixel being hit in blocks of the resulting image.
I then rendered this at 4K resolution over 2880 frames @ 30fps (for a run length of 1:36). This took 16 hours and 26 minutes looking at timestamps on PNG source files. I then ran a ffmpeg command to convert this image sequence into a mp4 and uploaded it to YouTube.
WARNING: This is the stuff of nightmares and should possibly be marked NSFL.

The looping effect looks a bit better when it seamlessly loops, but I had to run it at twice the rate due to imgur maximum video lengths:
10 Likes
Work must love your background. 
1 Like