Laser Etching Leather

Continuing the discussion from Leather Working Class:

So splitting this off from the Leather Working Class discussion. For those interested, here are some initial results I was able to attain. Please take into consideration, I have not worked with leather before, nor have I operated the laser before today. I was in the laser class yesterday.

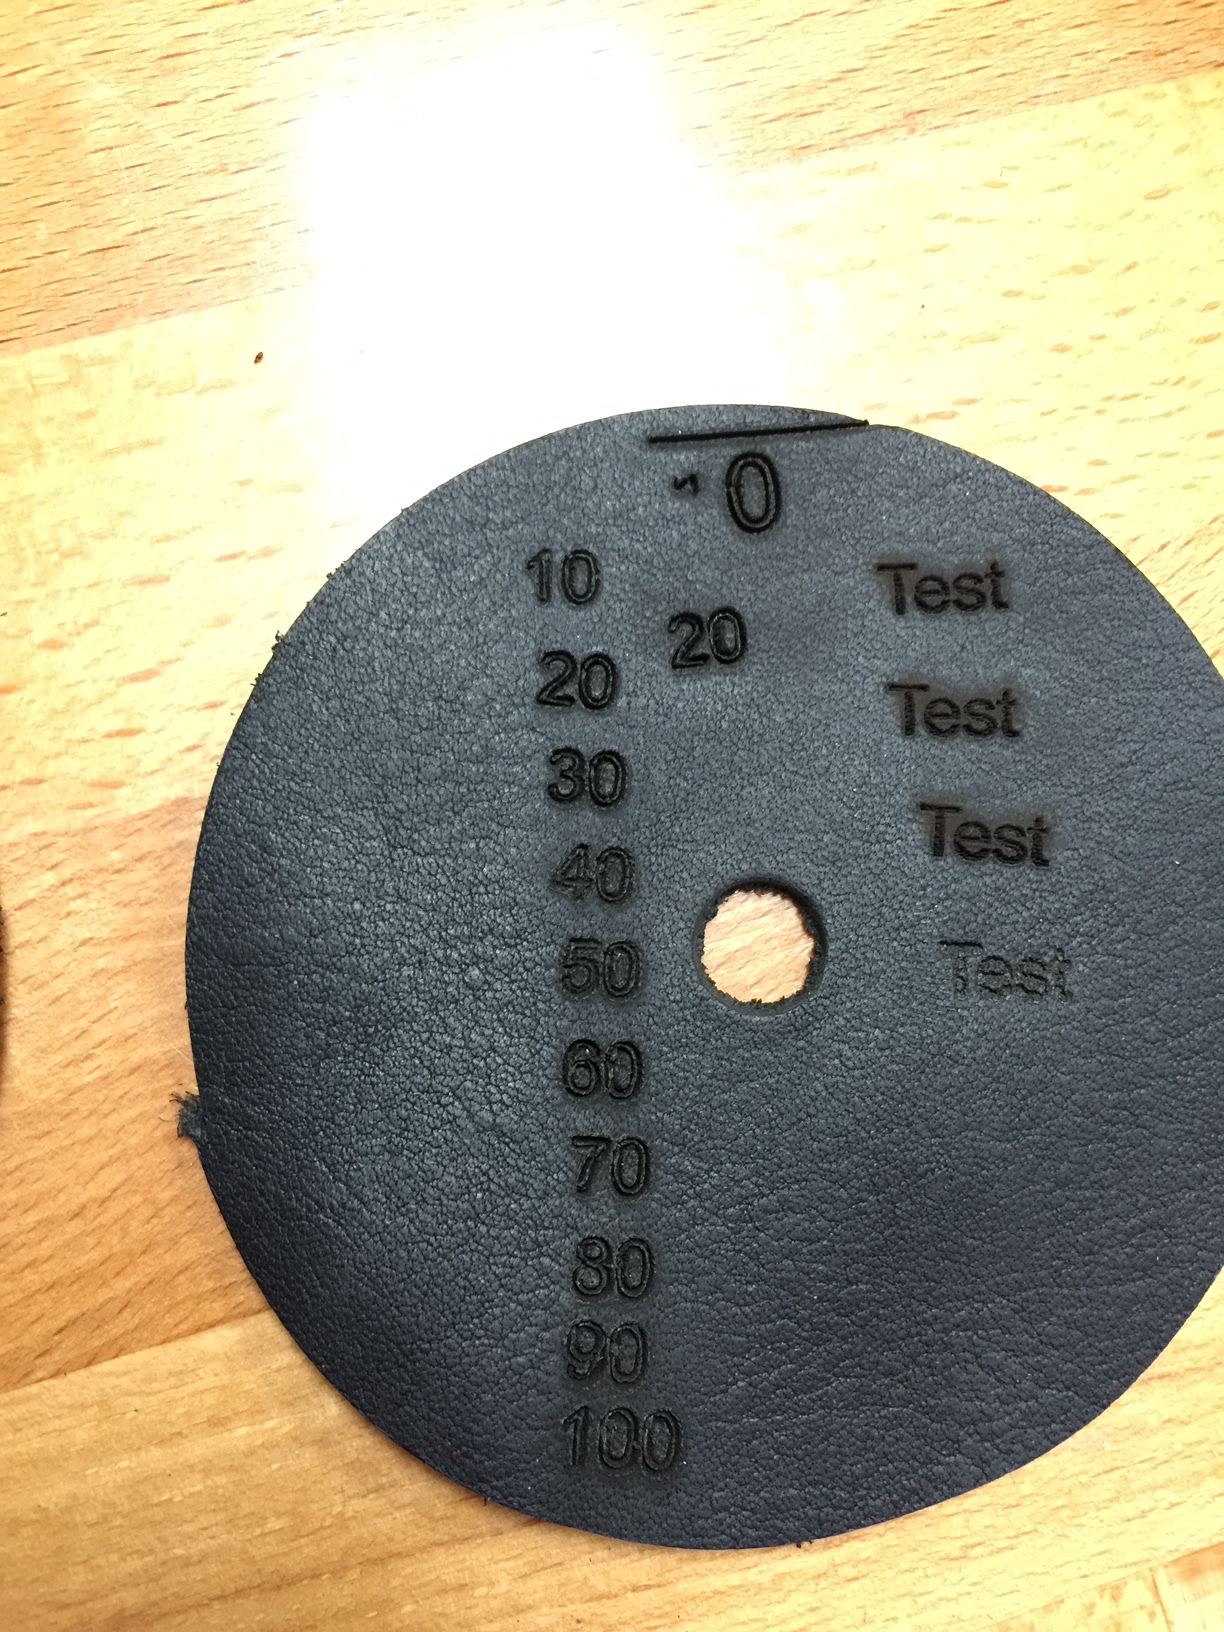
If you look at the 10 - 100 on left hand side. This is vector cuts running the laser at 100% and the stated percentage of power 10 = 10% etc. Hard to see from photo but but was noticing a lot of burns around the edges at higher powers. On the right hand side the “Tests” were raster engraving at varying speeds/powers with the bottom being at 1% speed and 1% power.

Encouraged by this fairly clean looking raster, I decided to do a photo. Again, I used 1% speed and 1% power. I did have to play with the white/black balance a little, but am very encouraged by the initial results. All cuts totaled around $25.00.

6 Likes

Your test panel is Great! Can you save the file so we can run a few pieces of different types and colors? We can then keep these on a “swatch” ring with the leather working materials.

Again - excellent approach and results.

1 Like

I showed up around 1:30 today (Sunday) but missed you. Thank you for posting your results to talk. I would like to try a few cuts as well as the engraving.

@coloneldan we must have past each other in the hall. Was in common room until 2:30 and then was back at space for a bit this evening.

@Photomancer not sure which file you were wanting. If it’s the etching file, I saved that to M:\Laser_Leather. If it’s the 10-100 there was no file. Each one was a process of move the leather, change the text, change the power output, render, vector cut, repeat. Not savy enough on laser to do all that on single pass.

1 Like

Thanks, I’ll probably get with Dan or someone that knows how to use the laser to make the swatches.

I’ll like to make some simple leather wallets using the laser to cut and etch the design. Does anybody with some leather laser experience want to help me out? I have the svg files and leather ready to go. I don’t live far from DMS so I’d be happy to meet with someone if they’re willing to give me a hand.

Thanks,
James

James I’d be willing to help out however I can. I will be at the space most of tomorrow.

Was playing around with the help of @apparently_weird on the full spectrum laser today experimenting with leather. Skipping all the intermediate results, the final settings I used was 80% speed/20% power/65 current for cutting and 100% speed/0.02% power for engraving. This was all done with the fine laser.

The cuts took 2 mins and the engraving took 18 min.

Was really happy how the cutting came out, but the engraving still needs some more work. Quickly licking my thumb and rubbing the leather cleans up the soot somewhat and a pencil eraser also worked but seemed to smudge a bit. The really fine lines and detail would probably turn out better as a lower powered vector.

Because I did the engraving (raster) then vector (cutting) as 2 separate steps, it didn’t align properly. When I send the svg to the FSL program it eliminates the page margins (crops it to just the image) which messes up the alignment. I saw a drop down box that said “raster then vector” which is probably the best setting but by this point I didn’t want to spend any more time or money playing with this.

If anybody has any ideas on how to improve the fine detail rastering or how to properly do rastering then vector in one go I’d appreciate your input.

Another update. I found a menu setting under Printer model name (Pro something)->Materials and focus test. This prints a 7x10 square grid that is 2x3 inches on your material. It varies the speed and power (you can set the max and min of these, but not the interval) so you can see how it cuts through your material at various settings. 98 speed and 20-30% power cut cleanly all the way through this leather without fraying or charring. Other combinations cut well but I’m interested in maximizing the speed. The test takes 4 mins to complete. Just thought I’d share this tip to help others quickly get within some ballpark of optimal settings

.

2 Likes

Sweeet!

Ok, will have to use this to find out the best settings for my veneer work on the pinball cabinet and playfield.

If your at the space, I can show you some veneer work I have done on the laser. Am in the common room at the far end.

Not tonight. I’ll probably be next in on Tuesday. Right now my biggest challenge is figuring out the proper measurement offset and how to apply them on the vectors to allow for the loss of material to the laser kerf.

Depending on the look you are going for, I find using the halftone setting on leather yields nice results.

1 Like