
or the one buying drinks 
Reserve that one for the inevitable south paw in the group. They will feel special!
2 Likes
I apply it to the back side of the complete image. Since I printed the image on matte vellum it is transparent which allows the gold to show through. I need to spend some time to get better prints on the vellum but so far it is working.
4 Likes
Actually, fixing the reversal is easier than one might think: just heat it back up and unwind the ring, then bend it around the other way. Basically making a mirror image of itself.
Once the forge and tools are set up and the item is heated, reforging it will only take maybe 5 minutes, 10 if I get picky on the final shaping. A min or two with a wire wheel and it’s done.
3 Likes
Nah. Fix a new one for the set, and then build a second round of three to match the odd one.
Once they are cooled, leave them in my storage bucket. 
They are really great. I can sense your pleasure in learning a new skill.
Before March fully runs its course, I’d better post a picture here of Wylie 1-Flip, the fully custom pinball machine I milled & drilled (and somewhat soldered) at DMS and exhibited at Texas Pinball Festival.
Too bad I didn’t get video of Derek playing the game…  Some other time though!
Graphics are all vinyl-cut, and the cabinet & playfield is made of MDF milled on the table router. The frame for my DMD (dot matrix display) was fabricated from scrap wood around DMS. Electronics are run by the Intel Edison dev board with Arduino breakout. Lots of 3D-printed parts on and below the playfield. Etc…
With @childofthehorn who as usual was very helpful with art, CAD work, and electronic parts selection.


6 Likes
Ummm, sorry - your pictures don’t seem to have come through.
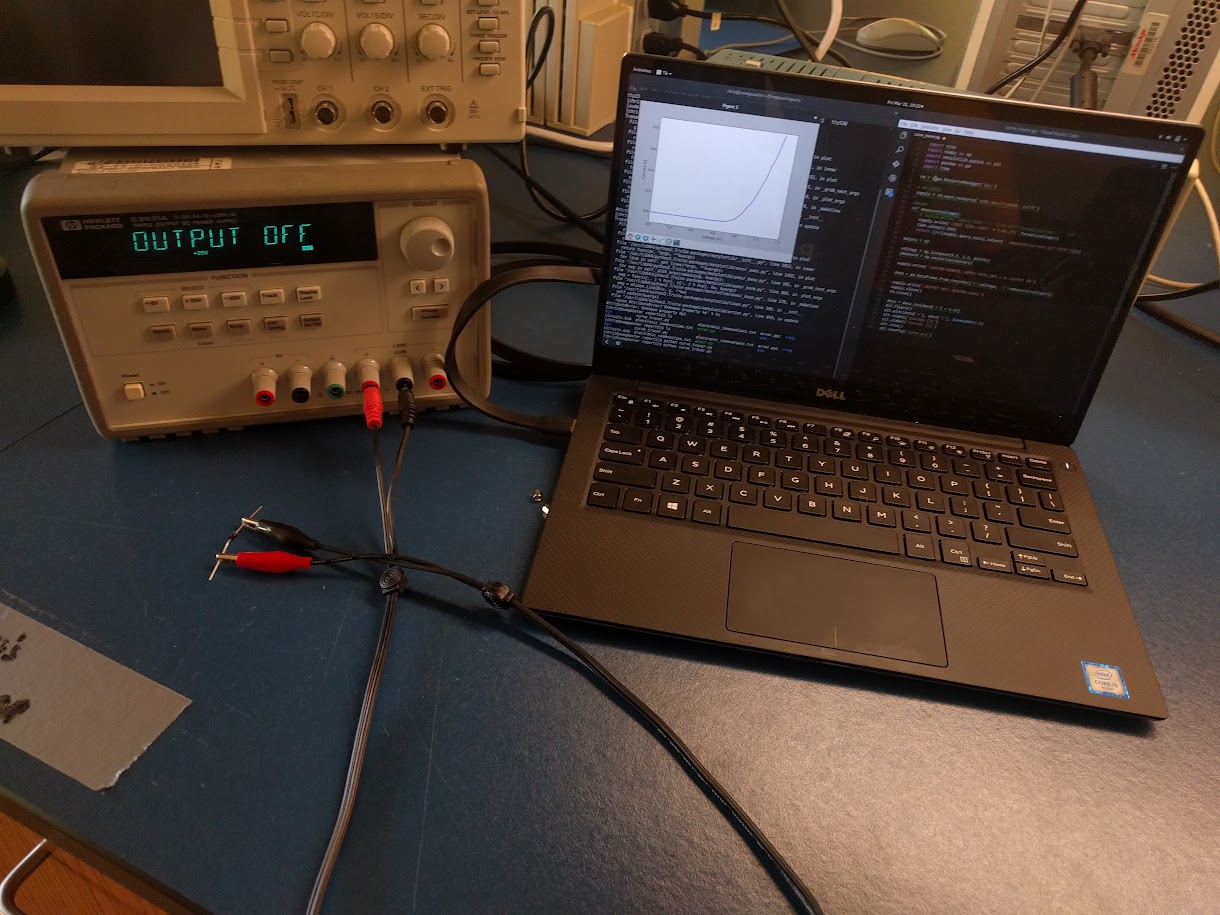
Not at DMS, but still pretty cool (and could be). Measuring the I-V curve of a diode over a serial port. In the future I’m planning on controlling the toaster oscilloscope on top of the supply. Also other goodies that are controlled with serial: function generators, lock-in amplifiers…
3 Likes
Did you learn any of the skills to do that at the 'Space? 
1 Like
Awesome project!
… and, Thanks for the reminder to all - that this is the last day of the month…
I’ll be adding a post with some of the things I have made / worked on during the month of March in a bit.
I would like to encourage members who have things that they have worked on at the 'Space during the month of March to post it ASAP! I’ll be closing this thread sometime between Midnight tonight and sunrise in the morning. I will create a new thread for April Show & Tell sometime around that time as well. There will probably be some overlapping time when they are both open… Please be sure to post your project in the correct Show & Tell thread - based on whether you worked on it in March or April.
1 Like
Back on March 11th… I dye sublimated three pairs of baby socks for my friend’s grandson. The Bird is a symbol for the Amtgard company the family is in. The baby is a 3rd Generation Corsair… 
This is the first pair of socks I sublimated (_**ever**_). I used a piece of wood from the scrap bin for the "jig". I thought I was being pretty smart ~ w00t! (_until I realized that I had flattened the top ribbing on the socks... "ooops"! Fortunately, I haven't met a lot of babies with a strong opinion on whether the top ribbing is flat or not... So, I am sure lil man will be happy with them either way...._ ;) :D ) [center][/center]

Here are all three pair together... I was pretty pleased with how they turned out (_yes, even the flattened one - LOL_! :D [center][/center]

For those who may be wondering, to prevent the other two pair from becoming completely flattened (_lol_), I made sure that the very top of the other two pairs of socks hung over the side of the heat press - so they wouldn't get flattened. :)
6 Likes
Teeny tiny socks! They are wonderful (squashed tops and all)
1 Like
On March 20th I took the “Introduction to CAD Design” class by Samuel (@snaps) and managed to successfully design a Lego-style “brick” using AutoDesk Inventor via the JUMP server!
[center]
[/center]
**...and, by the wee hours of March 21st, I had 3D printed copies of the brick I designed in class!**
Once the first set of bricks were finished printing, I realized that the text I had added to it was too deep, making it so close to the inside of the bricks, that when it printed, there were some gaps in the plastic. I also thought the little “bumps” on top seemed a bit tall… So, I jumped back onto the JUMP server, made a couple quick edits to my original file, saved it as .v2 and printed it out as well.
Here is a side by side comparison of the first bricks I designed and printed next to .v2:

I was so proud of .v2, I uploaded the following image to Instagram (_which copies it to Facebook & Twitter for me ~ w00t!_) ~ hehe.. ;) :D [center][/center]

Edit to add: The first sets of bricks that I printed right after the class, highlighted in this post, were printed on a PolyPrinter - the best FDM printers I have ever used! They were printed using ABS plastic filament, with the slider all the way up for "quality" (_vs speed_).
12 Likes
Inspired by a recent Kickstarter, I designed and 3d printed a jig for holding 25mm scale miniatures for painting. Mounts on top of a wooden spool from Hobby Lobby to act as a handle.
The platform base supports the mini, and the arc going over the top acts as a brace used to steady one’s painting hand while working on find details. Hobby-tac holds the mini to the base.

(click image to see full view of the part)
It prints as five pieces (base, ring, arc, and two locking pins which anchor everything together). Worked on the first try: everything fit together just like I envisioned it 
8 Likes
Worked on brushing up on my English wheel skills this evening. It’s been about 10 years since I have used one. I also used the new shrinker stretcher. These tools are not ready yet for general use but will be soon. I cut out my generic shape on the throatless shear then moved to the s/s. Then to the English wheel, ahh the repetitive back & forth to each tool. So I made part of a motorcycle gas tank. No I don’t have a bike, it’s more or less to get my skills up to par. On the right is about what I started with.

15 Likes
A couple of days after designing and printing the first set of prints with ABS plastic (in the wee hours of March 24th), I took the plunge and printed .v2 of my brick on our new Form2 SLA resin printer…
Please forgive the overload of pix… I’m in “new mommy mode” with excitement over how pretty the new printer prints!!! 
**.v2 brick being printed in resin**

**.v2 brick just finished printing... still on print platform with resin dripping off the tip...**

**.v2 brick "curing" under the UV lamp**

**.v2 finished curing - initial comparison with the .v2 printed with ABS on a FDM printer**

**.v2 finished curing - initial comparison with the .v2 printed with ABS on a FDM printer**

**OMG ~ Look how clear the text is!!! :astonished:**

**...and, how well the bottom printed!**

**Comparison of the text on the resin (SLA) printed brick and the ABS (FDM) printed brick...**

**...and, how smooth the lines are on the resin brick - zero warping!**

**Here is a comparison of the "texture" of both types of prints...**

**...and, another side by side to see the difference in the text, edges, everything!**

**Finally: The collage I shared via Instagram (_including Facebook and Twitter ~ 'cuz that's how it works ~ hehe..._)

**And, now for the "reality check":**
- The first two bricks I printed with ABS - before the modifications - cost me $1.30
-
The second two bricks I printed with ABS - after the modifications - cost me $1.20 (remember, I shorted a bit off the top of the “bumps”…
 )
) - The set of two bricks that I printed with resin, with the .v2 model, cost me $6.90
The ABS bricks were printed with the slider all the way up for “quality” (vs “speed”). The resin bricks were printed using the “medium” resolution option and whatever default settings that go with the one click print option. Basically, the lowest resolution on the Form2 is roughly equivalent to the highest resolution on a PolyPrinter (which print damn great prints for FDM technology!).
As “purdy” as the resin printer prints, it is definitely not something that you want to print without having a need for the fine details. Not only is it extremely expensive; but, the items printed in clear resin tend to be brittle. All that said, there is definitely a use for it; and, I hope other members who have those needs enjoy the benefits it has to offer! I know Axie has already given a class and Mitch has one on the calendar. I will be putting some up soon, too. Please keep any comments about “when is the next class” in the #3d-fabrication category though…
11 Likes
The resin bricks certainly do look wonderful, and this is a good rundown of the comparison. Do you recall roughly how long the two printing processes took?
2 Likes
Thanks!
The FDM / ABS (PolyPrinter) bricks took around one (1:00) hour per set of two, if I recall correctly.
The SLA / resin (Form2) bricks took around five hours and forty (5:40) minutes, if I recall correctly. Then, another full hour to “cure”.
2 Likes
Wow ~ that is awesome!
It’s really amazing what can be done at the 'Space!
…now it’s time you get started on the rest of the bike…
1 Like
Thanks to a course at DMS, I’ve resurrected a prior interest in neural networks. Back in the day, they were junk algorithms that never lived up to the hype. But within the last couple of years, they’ve begun outperforming nearly every machine learning technique out there.
Right now, as kind of a test, I’m training on a 36,000 image dataset to classify a few basic human emotions: anger, fear, happiness, disgust, and surprise.
I’m also feeling a strong desire to resurrect my interest in video game botting, given the recent advances. If anyone is interested in a coding class on video game botting using neural networks, please let me know.
Small sample of the dataset:

4 Likes