
Yea, I am working with a limited library of symbols. Revised diagram is below:
Ok; we have the insulation here. We need to pick up some sheet metal at Lowe’s. We can start work on the controller, the door, the door seal, and the insulation. Who can be here on Thursday (tomorrow)?
1 Like
I can be here tomorrow, but I have a lot of work. As such, I can help you when you need an extra pair of hands.
Ok; closed up the big hole in the door with some 16 ga stainless. Closed the two fan openings in the back of the cabinet. I am going to do the small opening in the door and the large filter opening in the back next.
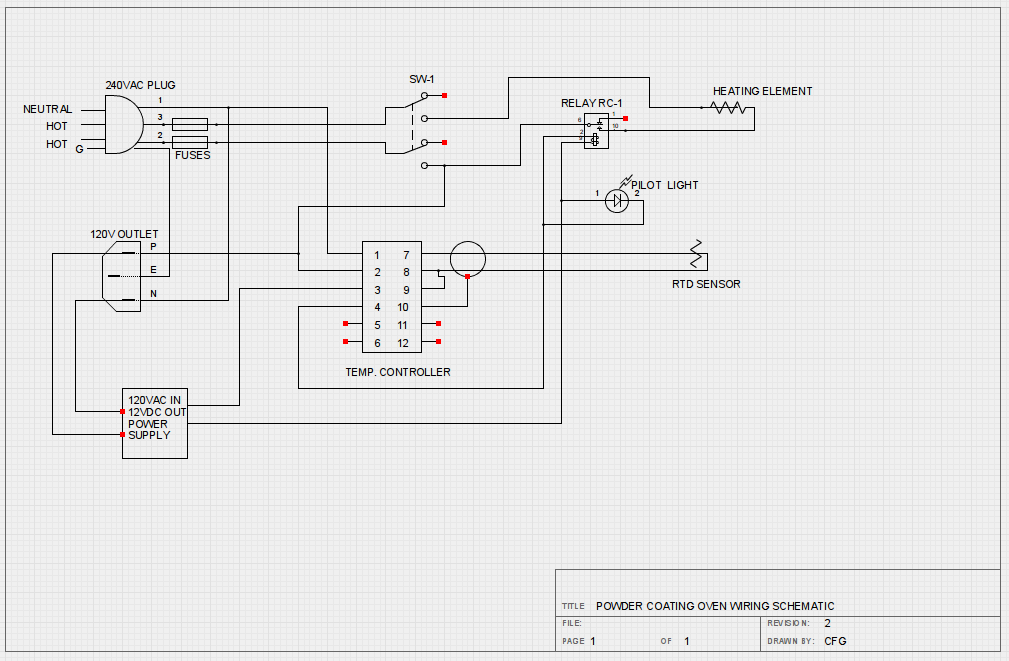
For the wiring this is where we stand:
Things we still need:
(1) Plug, 208V, single phase, w/ Neutral & Ground
(2) Fuses, __Amps, 250 volts
(1) Socket, 120 volt
(1) Switch, 50Amps, 250 volts, DPST
(1) High Temperature Cutout, 250 volts, 600 Degrees F.
(1) Timer Switch, 2 hours, 120v
(20’) Power Cable, 50A, 250 volts
Things we have:
(1) Power Supply, 120VAC in, 12 VDC out, 1.2A
(1) Temperature Controller
(2) Pilot Lights
(1) RTD Sensor
(1) Relay, Solid State, 208 VAC, 25A, 5-30 VDC control voltage
(2) Heating Elements (use one for now)
(1) Enclosure 8x8x6
We need some wire coat hangers to secure the insulation while we build the liner.
If anyone is at the Space you could strip out all the parts inside the control box. It is presently located inside the cabinet. The controls in it are for an old heater box. We are going to recycle the box, terminals, pilot lights, etc. Don’t throw anything out yet.
Insulation and liner next week. Come by on Tuesday night, and we can start work on it.
1 Like
I’m unlikely to be there Tuesday. I’m in the HAAS class Wednesday night and could hang around a bit after. I might be able to scrounge a fuse block and fuses. Clarify “Socket, 120Volt”: light socket or wall outlet ? And let me check when I get home. I may have the old service disconnect from an HVAC upgrade. Not sure it if goes to 50 Amps, but then if your SSR only goes to 25A, then you don’t need that big a switch.
1 Like
Ok; we have a mounted temperature controller:

We will not need a bezel.
The old guts have been stripped out of the box, so we just need to wire it. I am thinking we could put a 120 volt outlet in a box on the side of this box, to plug the wall wart into.
3 Likes
We have the power plug and cable, some conduit (flex & rigid) and some miscelanious wiring stuff.
Still need:
(1) Switch, 50Amps, 250 volts, DPST
(1) High Temperature Cutout, 250 volts, 600 Degrees F.
(1) Timer Switch, 2 hours, 120v
I will get the 120v socket & fuses. Working on it tomorrow night.
2 Likes
Anything to help with tonight for the power coating oven?
Making some progress. Brandon Green and Nick Sainz helped out.
All of the openings in the enclosure have been covered with sheet metal, and we have started to install the sheet metal liner. We can start on the insulation any time.
The door is ready to be insulated, with all the holes covered. We need to wire the control box next.
Thursday night we will be working on it again, starting around 4PM.

Can you build a second one to smoke brisket or turkey legs? 
Go buy one of these for that: http://dallas.craigslist.org/ndf/for/4998802039.html

I own one and it simply rocks! Use the hickory pellets. I can smoke 3 racks of ribs and a turkey breast in one go at 215F for 4.5 hours.
How’s the project coming and can I help in any way?
I want to powdercoat my motorcycle frame, wheels, forks, and a few other small parts plus I’ll need an oven soon for some other coating projects.
I’ll be more than happy to work toward getting it finished.
Jeremy (and anyone else who wants to help); I will be here tonight and
Tuesday to work on the oven. Come on by and lend a hand.
We are going to start installing insulation. This is NOT the
itchy-scratchy stuff; it is just mineral wool.
Jeremy and I got the three walls of the oven insulated and wrapped in sheet metal. We need to insulate the top and bottom, and the door.
I will try to build the electronics tomorrow, and get the material for the door and top/bottom. Wednesday and Thursday we can work on the oven again. Be there or be square.
2 Likes
Ok; got the control box wired. It needs to be mounted, and have the heat sink & RTD installed. Tomorrow I plan to insulate the door, and the top and bottom panels. Then we can mount and wire the heating element, install the door latches, and fire it up, probably first of next week.
Control box being tested:

2 Likes
Got the door insulated and re-hung. Just need to insulate the top and bottom,add some door latches, install the heating element, and hang the controller.

5 Likes
Very nice work on this!
Excited! Have some killer uses for this down the road.
Can I help in any way this week?
The oven hit 400 degrees for the first time today. It could use a few tweaks, like adjusting the ramp up. It took 7 minutes to get to 350 degrees, but twice that to get to 400. I think the controller is pulsing the elements when it gets close to set point.
We need to put the oven under a hood eventually. If we put in a paint booth, we can use that exhaust. For now the oven is portable, with an adapter to power it from the automotive charging station.
I need to space the cabling out from the box also.
Does anyone have experience doing actual powder coating?
4 Likes