Small issue with CNC Router (With fix installed)

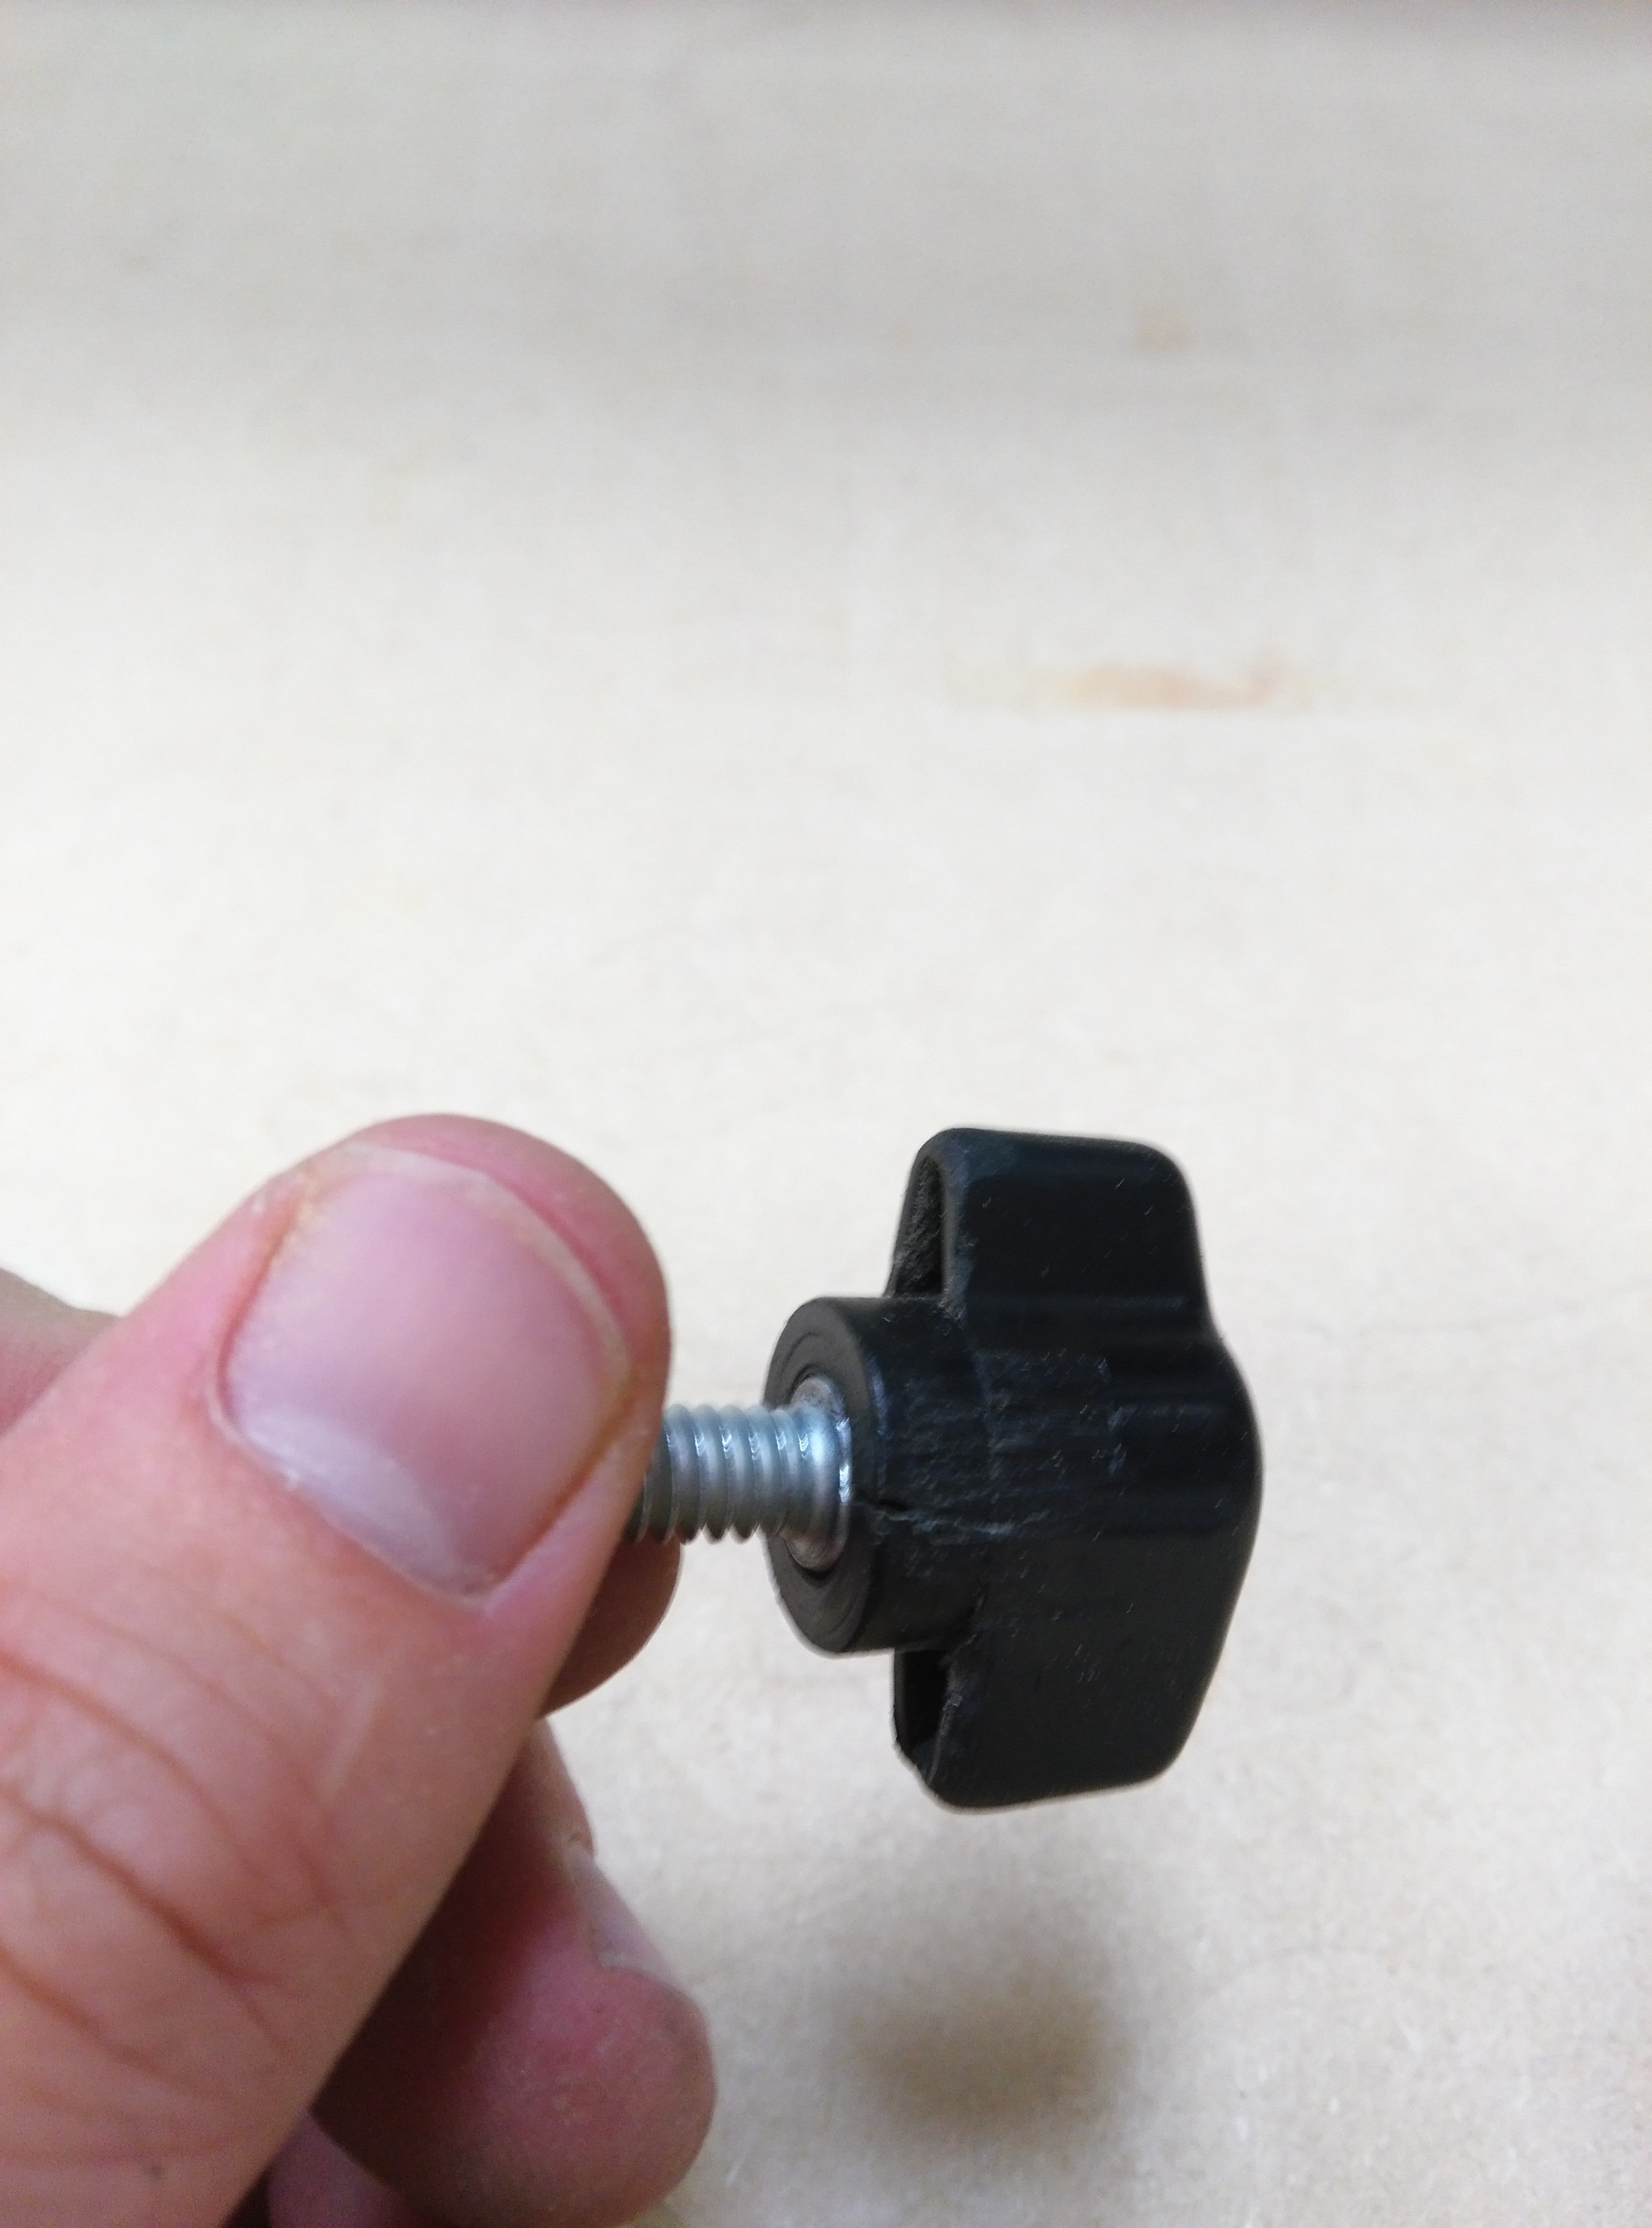
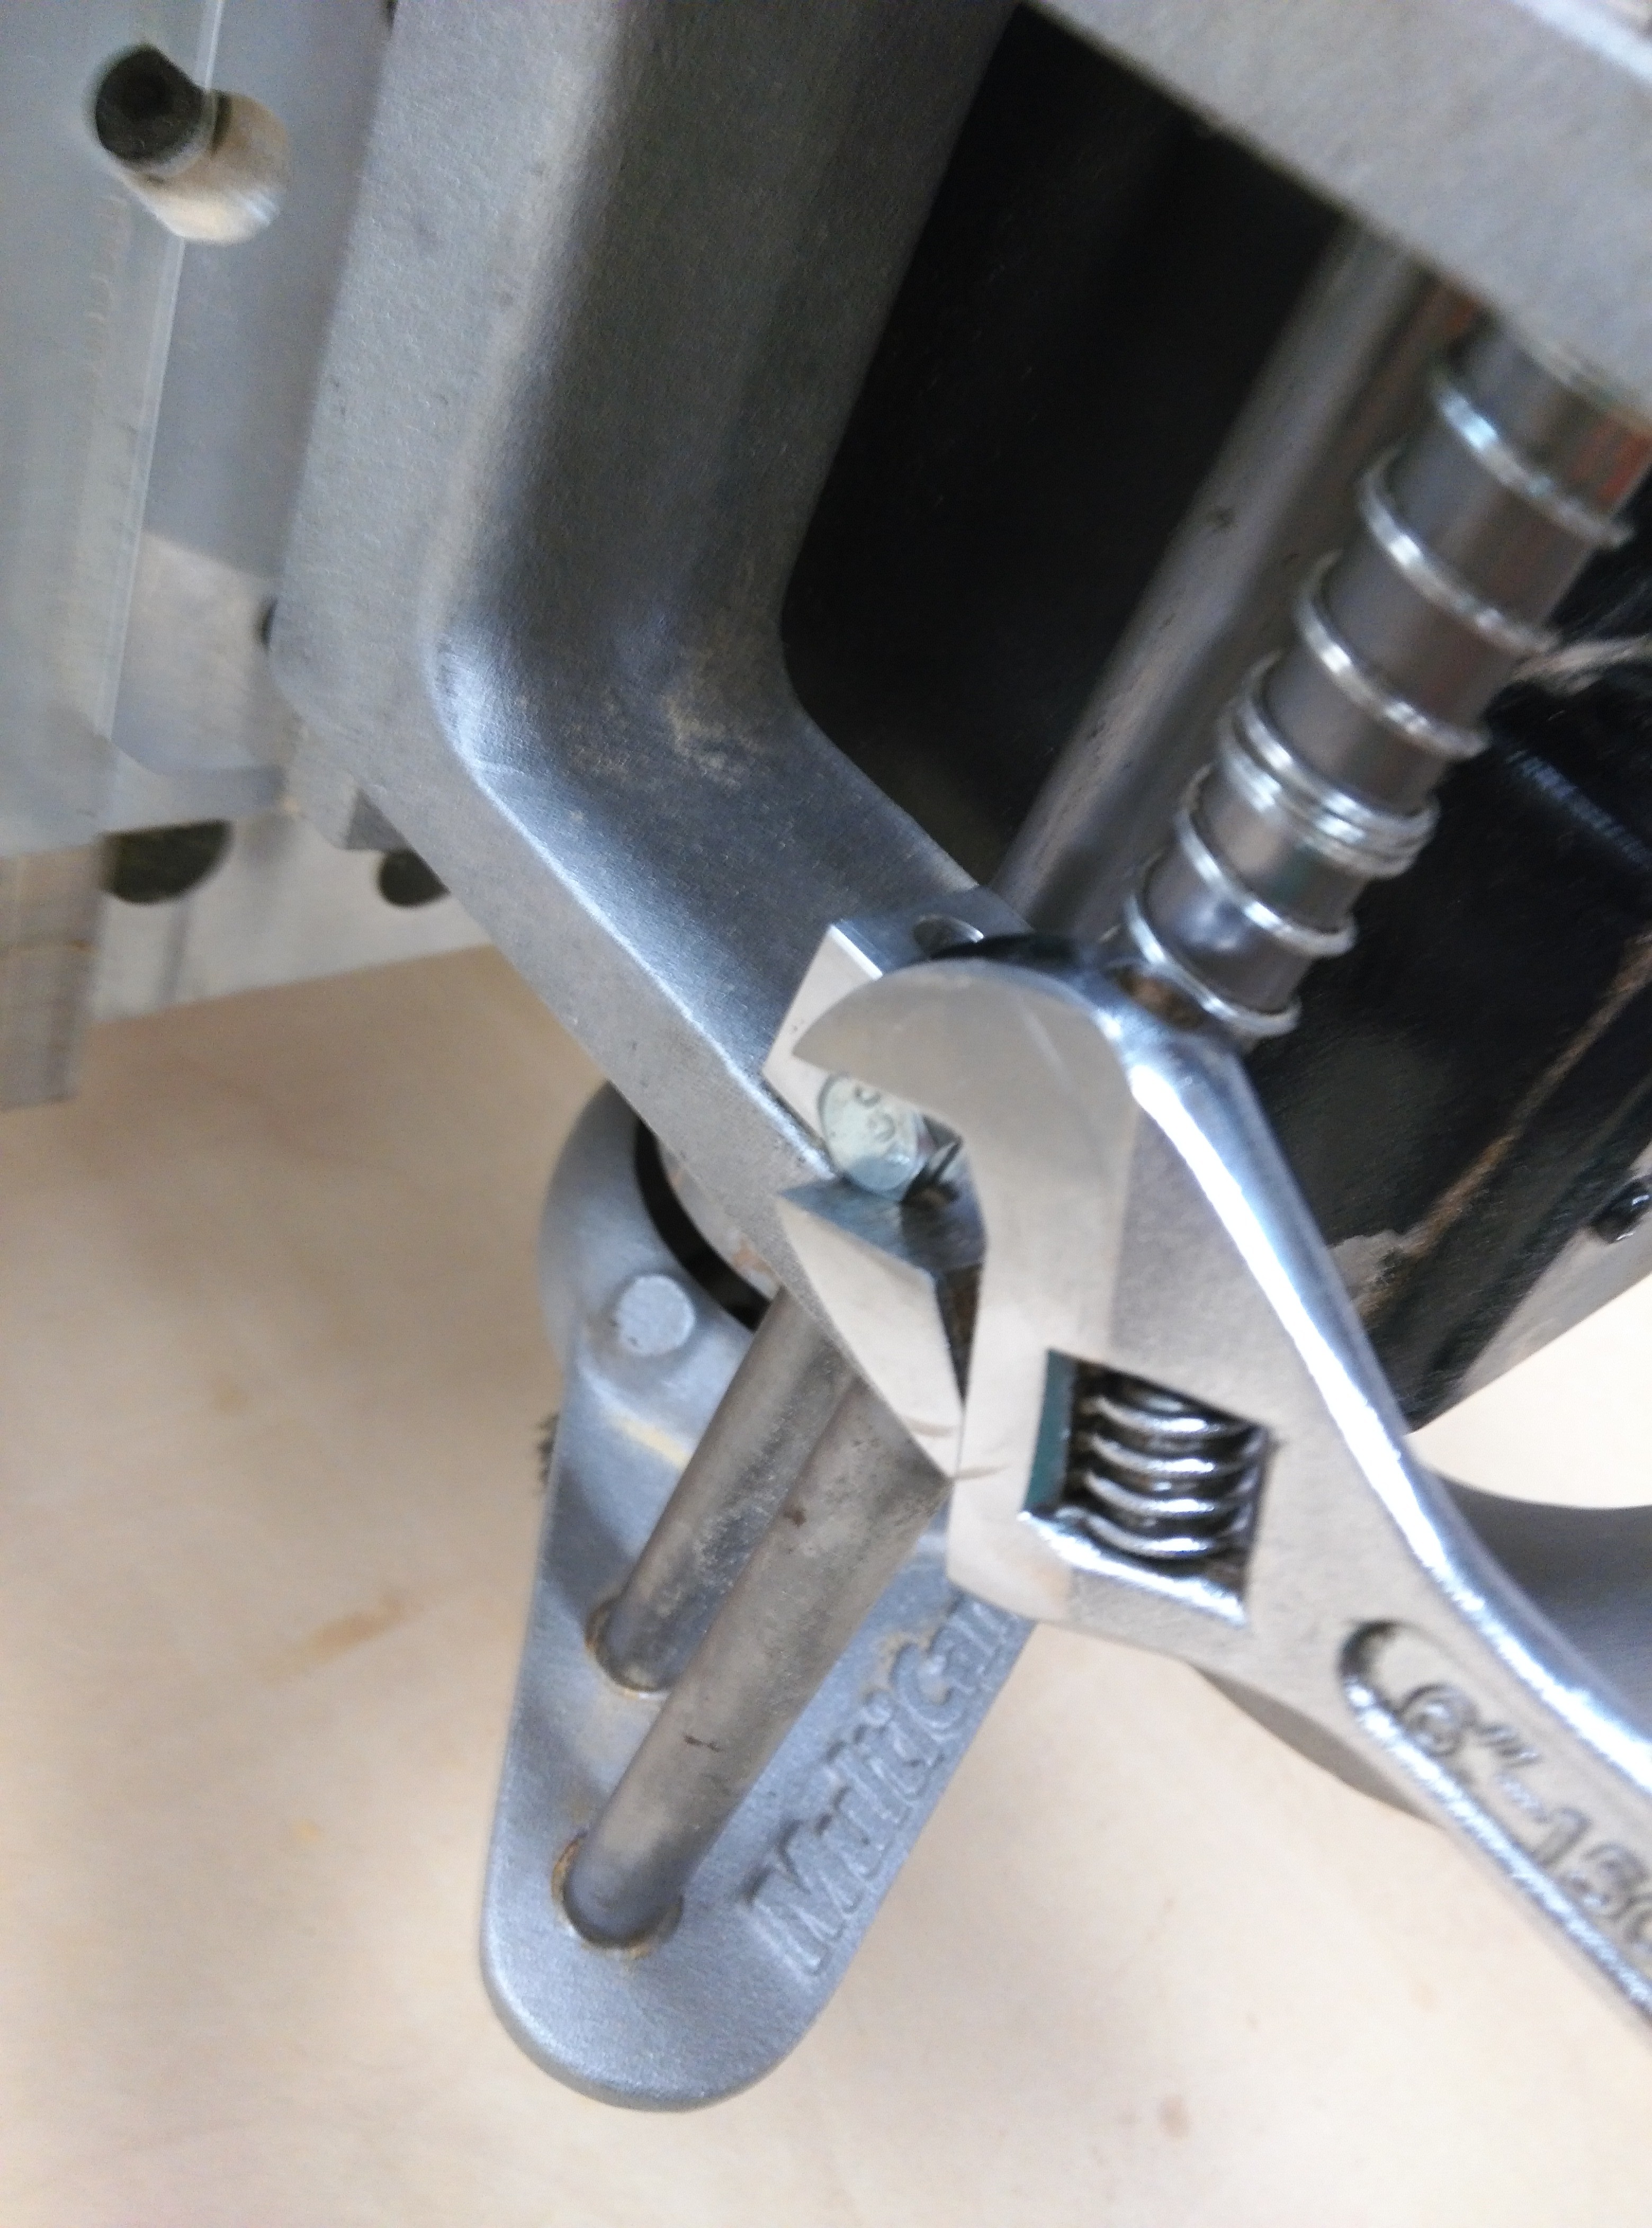
The plastic wingscrew that locks the dust connector in place cracked on me today. I was able to remove it with some pliers. For now I have replaced it with a bolt of the same thread (#1/4 - 20). You will need to use a crescent wrench to tighten it for now. We will probably want to get an all metal wingscrew with the same threading at some point soon (ex : #1/4-20x1 Fastenal ). We could maybe 3d print and epoxy a winghead around the hexagon bolt too. For now though, this should work so it is still up and running, although with the added need to grab a crescent wrench. I left a paper note on the router table too with this explanation so whoever uses it next will get the memo. Let me know if there is anything else I can do.

Thanks,
Ross Dusenbury
[email protected]

1 Like

Given that the original wingnut probably failed due to over tightening, I am not sure a wrench-tightened bolt in an aluminum clamping mechanism (not sure it is aluminum, though) seems like a good solution. Somebody (same type that over tighten a wingnut) is going to strip it.

2 Likes

Here’s one solution to that concern, albeit not cheap.

OOoooOOOOoooooo! I likey! I’ve never seen one, those are pretty awesome.

I think some people might not realize that the dust-shroud-limit-clamp-screw-thing doesn’t need to be real tight. Maybe we should consider adding a slide to the training about how the dust shroud spring mechanism works and how you adjust it properly (since it has now been broken due to misuse)? It was a couple of cuts and some experimentation before I was comfortable setting it low enough to be truly effective. @AlexRhodes @Kentamanos @Tapper ?

Edit: I would guess people over torque the collets too, for what that is worth. 25 ft-lbs is all you need according to this: http://www.techniksusa.com/metal/torque_chart.htm (ER 25 with mini nut)

Lol. The old one was torque limited.

1 Like

Call Multicam in and get it (the wing nut and the Z-axis) fixed. That’s what the warranty is for and they are located pretty close to DMS so its not much trouble for them.

7 Likes

@apipe would you please call them, I don’t think Ross is a trainer or part of the support team for the router table. So I’m not sure he knows how to escalate this above the post he made on talk.

What’s the status on this? Was Multicam called?

This is the one machine that i joined DMS for and since the the increase of interest now here come the issues. The other day I was there, i noticed somebody damn near cut clean through the sacrificial board.

I just hope this doesn’t end up getting so screwed up that it ends up on the unusable list due to folks ignorance and negligence.

1 Like

The nut has been replaced and the machine is fully operational (it was around 1am today).

edited for clarity

What about the z-axis, is it still slipping?

Was it ever slipping?

it did slip at one point and @Chris_Wischkowsky did a minor tweak. It is 100% at this point and we cleaned the collets, some bits and nut last night as well. There is still a pocket in the spoil board but its kinda in the center of the board and hasn’t affected any projects so far, but if you feel it needs to be resurfaced, feel free to do so.

1 Like

A few weeks ago i was doing a job and Tom mentioned the z-axis was slipping for some odd reason. A few of my pieces also didnt cut all the way through and it was at least 1/8 to 1/4 inch left in the material to the sacrificial board.

So i was assuming this is the same issue @apipe was referring too.

Yep this has been fixed.

12 posts were split to a new topic: Resurfacing Spoil Board

We need a small edit to the instructions. The instructions essentially say:

  1. Set machine home
  2. Load a bit
  3. Run spindle warmup

In reality, this encourages loading the bit at the machine home position, which is a really bad spot to try and load a tool (slip out of collet, dinged bit).

We need to update it a bit to go something like:

  1. Set machine home
  2. Cancel spindle warmup prompt
  3. Jog over table (better place for bit loading)
  4. Load bit
  5. Run spindle warmup from pendant (it’s the button that says “TEST” on it)

Does that make sense?

1 Like

Yes sir, got it, i will make the changes.

It’s in the important notes, but needs to be said during startup as well.

• Change the bits over your job to ensure they do not hit the floor

In the instructions can we add some language regarding how to get it out of the “Machine home not set” dialog (or something like that) upon start up. Sometimes it’ll auto find machine home at boot. It takes a couple of button presses but finding that has delayed my projects a couple of times. You may cover this now in the Router classes. I was the a part of the first CNC router trainee cohort/class.
Thanks for the update on the “z-slip” issue.

Lost me on this one, wouldn’t cancel work. I’ve never seen it auto-find home at bootup before, I was under the impression you had to Shift - Go Home to find the hard home at boot-up?

That’s Correct. I didn’t have the “Shift-Go” to find hard home in my notes from the first class and had to figure it out by finding the manual online. IMO it should be apart of the startup procedures before finding your ‘soft home(s)’