
Yes, I’ve heard about the chrome rods arriving to the buyers being already bent. Some people didn’t notice and it caused binding which lead to skips and overheating steppers. I know I’m expecting champagne taste on a beer budget, but I’d at least like the best beer for the money.
The three most important parts of a 3D printer are:
- The Extruder/Hotend
- The Control Board
- Mechanical Rigidity
As far as rules of thumb go:
RAMPS 1.4 == Trash
Bowden Tubes == Unreliable printing (even Ultimaker’s Bowden tube has problems)
Low quality Extruder == Unreliable printing / Hard to service
Low quality Hotend == Unreliable printing / Hard to find nozzles
Given these rules of thumb I would buy the GeeeTech:
https://www.3dprintersonlinestore.com/diy-kit/high-speed-prusa-i3-kit
I would then expect to upgrade to this printer to use a Printrbot Extruder:
http://printrbot.com/shop/printrbot-alu-extruder-v2/
and E3D hotend:
http://e3d-online.com/E3D-v6
When you get fed up with prints curling and parts not sticking to bed I would recommend upgrading to an enclosed print bed like this printer:
You will likely at this point want a better heated bed… You will likely need to go full DIY at this point
In conclusion there is no such thing a 3D printer for $400 that will do what you want (PLA only maybe, ABS not likely, Nylon nope and woodfill expect to clog a lot of nozzles no matter the printer you are using). But for $400 the Geeetech gives you an ok starting point I would expect to spend another $400 to $600 in upgrades and failed experiments over the next few months if you really want to get into DIY 3D printing. Also keep in mind a DIY printer or even most (read: all) budget printers are a hobby onto themselves, you will spend more time tweaking and tinkering with the printer than printing with it.
2 Likes
Frank, you’re killing me! Don’t you know that I was wanting you to lie and say all these machines are awesome and I will print everything perfectly, every time?!?!?!  JK.
JK.
Yeah, I know that anything in that price will have it’s shortcomings. That’s why I was curious if there’s a “kit” of good parts and I just need to come up with a frame.
I know I’m spoiled by the PolyPrinter here at work, but there’s a few guys who have Prusa i3 variants that have pretty decent results, but clearly not the quality of the more expensive, professional machines.
2 Likes
It really isn’t a question of ‘quality’, but rather reliability and speed. My printrbot metal simple is able to produce parts that rival the polyprinters in quality. It just can’t do it day in and day out like the polyprinters since it requires frequent maintenance and repairs. In some cases nearly after every long print.
If you decide to go this route, I strongly recommend building the printer at least from a kit, and perhaps from scratch (we are makers and you have access to the same tools they use to build the polyprinters). That way you will be completely familiar with all of the aspects of the machine and be able to actually have a reasonable chance of keeping it running.
2 Likes
Yes, I definitely want to build it from a kit…just to what degree is still up in the air. I don’t think building the frame will be as much of an issue as sourcing all the other electrical components will be for me, since I’m not sure what’s the best for the money. I’m trying to balance cost/performance as much as I can.
Whatever I get, I will be running the heck out of it, that is for sure.
I’m going to have a class probably around the beginning of next year (See Gauging Interest - RepRap 3D Printer Build Class V2) building the Makerfarm Pegasus which seems to be a nice $400 kit. It comes with a E3D lite6 hotend which is a good starting point (won’t go over 240C so no nylon or high temp materials, but you can upgrade to a E3D v6 for $80), The rest of the kit looks decent, you could replace the lasercut and printed parts easily, the extruded frame seems like it could be rigid or made rigid with struts.
I would mainly avoid all the chinese-based i3 kits mentioned above because of the service or lack of service you will get. Folgertech is supposedly OK, but you will be replacing parts as Frank mentioned to get it to print well. Makerfarm has an actual guy Colin that provides support
Printrbot Metal is my choice as well but it’s a little over $400 for a Simple kit, you’ll still need to build an enclosure and heated bed, all-metal extruder upgrade.
I’m mostly worried about the quality of the rods/threaded rods/bearings/stepper motors/control board/stepper drivers/extruder/hotend straight out of the box. Does anyone sell those parts in a kit without a frame?
Wow, after re-reading that last comment, I’m pretty much worried about everything in the kit…haha! Surely there’s a somewhat decent option without spending an arm and a leg…or both of each.
Any hardware you buy for a $400 printer will be sourced from somewhere in China probably from a wholesale site like Aliexpress. For example I bought 8mm smooth rod both stainless and polished from the Folgertech ebay store, the quality wasn’t bad for the price. Then I tried ordering LM8UU bearings from various sources (probably the same random chinese manufacturer) and like 20 out of the 60 I bought were bad. Self-sourcing a kit is a PITA I would not recommend it.
Electronics on the other hand, I chose to order from http://www.panucatt.com/Default.asp they have really nicely designed controller, stepper drivers, etc.
Steppers are generic Kysan or similar brand.
Lm8uu from misumi are only $24 each 
Im going to use brass bushings in my personal project which uses the corexy arrangement. I have been cutting prototypes on the laser and so far so good. Uses 2020 extrusion for the frame and all mechanical parts mounted to a common surface (waterjet cut aluminum plate). Bed size is 220mmx220mm. Height is scalable.
Igus drylin bushings seem to be quieter and more reliable than lm8uu bearings, but I would get the 8mm equivalent model with the sleeves because they provide compression when the bushings wear. I’m going to order some and try them out.
can i go in with you on the order?
i need a few…let’s chat
So wait, why is Ramps 1.4 trash? I just ordered a Makerfarm Pegasus e3d v6 10" with RAMPS 1.4
1 Like
It is not trash.
It will get the job done. Just don’t expect too much (speed/quality/consistency/reliability) from a $400 kit
The main issue with Ramps 1.4 is it lacks all protection circuits. If you happen too wire up your Ramps wrong instead of failing safe (ie. nothing bad happens) your Arduino is likely to get damaged.The easiest thing you can screw up is attaching the limit switches.
Exhibit B:

These are both wiring diagrams for the Ramps 1.4 if you look at the way the end stops are wired you will see the problem. One diagram claims there are 2 pins the other claims 3. So lets take a look at the official drawings:
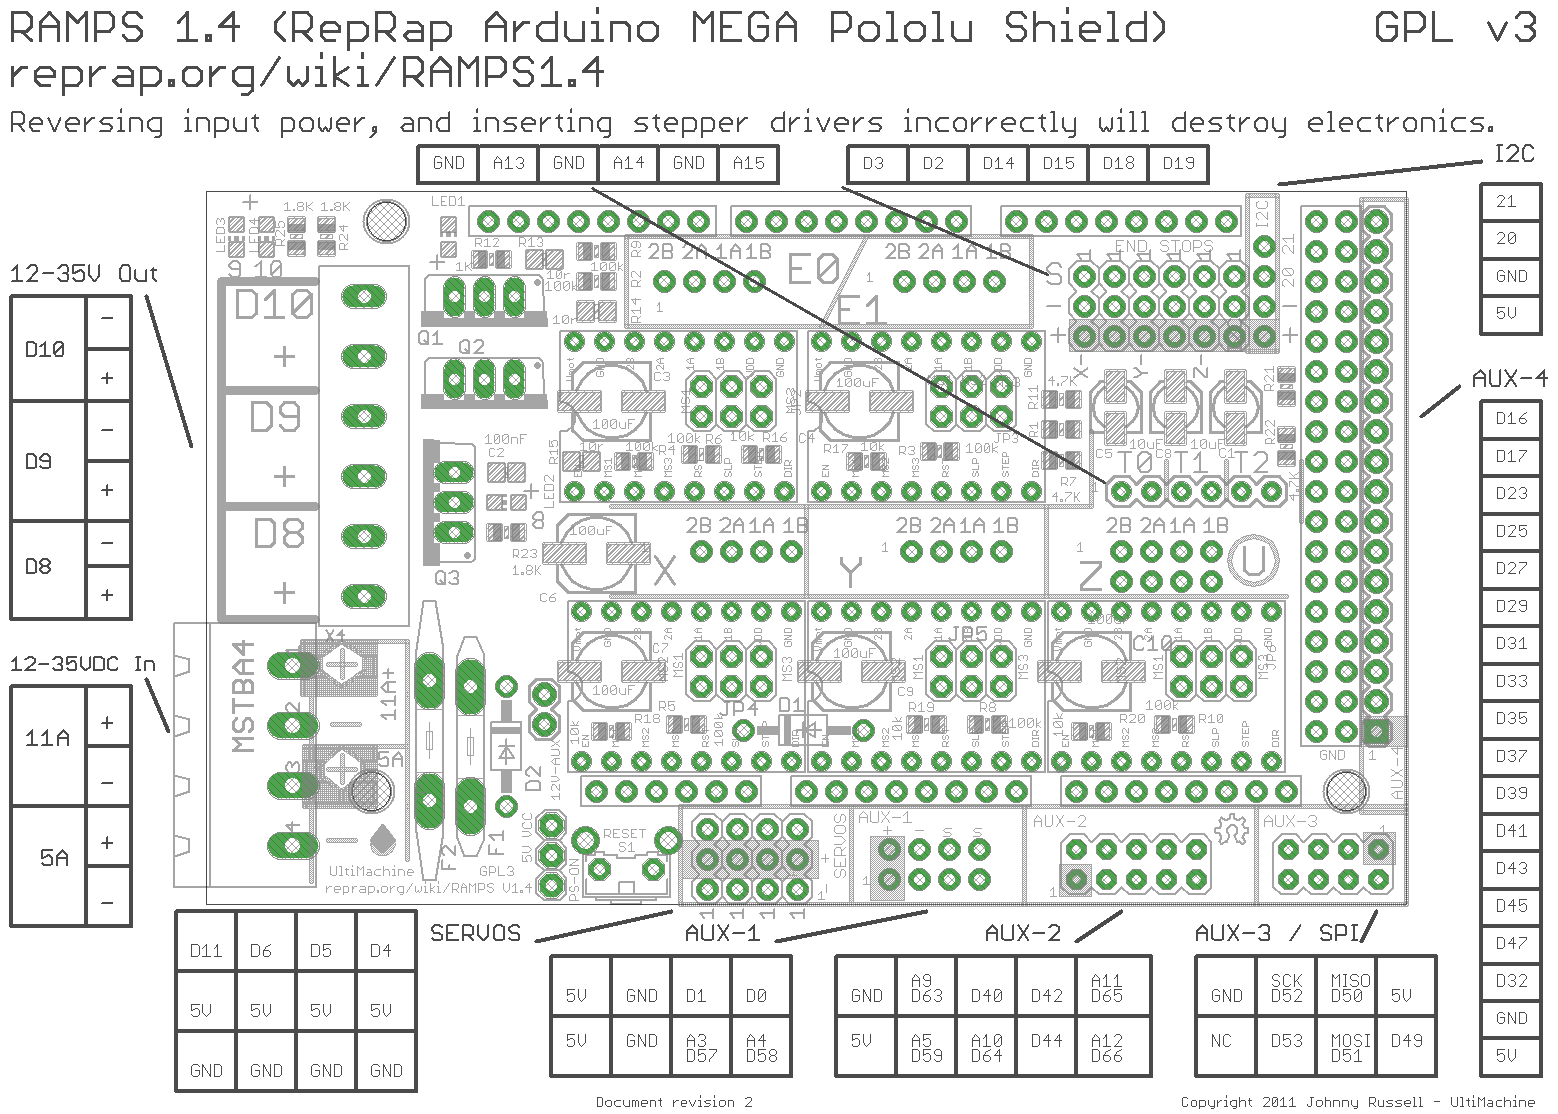
Ok so if you are using a 2 wire end stop what 2 pins should you use?
Mechanical Endstops
MechSwitches 2Wire.JPG
The recommended firmware will provide a configuration to use mechanical endstops with just two wires.
Find the area labelled “endstops” in the upper right corner of the board and for each of the X, Y, and Z pairs of pins (label should be below each set) do the following:
Connect S (top row, labelled to the left) on RAMPS to NC on the switch.
Connect GND on RAMPS to C on the switch.
Note: The latest firmware such as Marlin seems to use NO as the default pin on the switch. Otherwise you may need to invert the endstops in the firmware. You can use M119 to check your endstops status.
From ramps wiki: http://reprap.org/wiki/RAMPS_1.4
If you happen to do this wrong your Arduino is toast.
But that is two wire end stop. you should be using a 3 wire end stop. Well depending on the type of 3 wire end stop you have it will ether be fine if you plug it in backwards or the end stop will fry as soon as you do.
Next we move on to the Mosfets for the print bed and the hotend. The hotend Mosfet is OK it is sufficiently rated to handle the power it has to deal with. The bed Mosfet on the other hand is right on the edge of what it is rated to handle. This is fine as long as the heated bed you have fell within correct tolerance. If your heated bed is too low in resistance well guess what. Fire hazard  time!!!
This pattern of quick hacks and “good enough” fixes is all over the Ramps 1.4 board. I would recommend not using it. But then again blowing a few Arduinos is part of the fun.
8 Likes
What do you see as the best go-to-board these days?
Wow, great maker feedback! Good info from someone that has actually read/parsed the data.
Awesome write up Frank,
I love seeing this level of description in a thread, we need to award some carma credits for this. 
1 Like
My personal favorite is the Azteeg X3 but I hesitate to recommend it given the questionable ethics of the company:
http://www.panucatt.com/Azteeg_X3_reprap_3d_printer_controller_p/ax33dp.htm
Another great choice is the SmoothieBoard:
http://shop.uberclock.com/collections/smoothie
The latest version of the PrintrBoard is OK. It has some issues but it is defiantly better than RAMPS 1.4.
http://printrbot.com/shop/printrboard-rev-f/
3 Likes
Although I’m not considering building a 3D printer soon, I am considering building one next year. I find this level of detail very informative and useful. Frank, if you’re ever interested in teaching a 3d printer construction class, I’m in. Thanks for putting this information together for those of us new to the 3d printer construction world.